
How To Do Wheel Throwing
Wheel throwing is among the most well known methods of pottery, which allows users to transform an ordinary lump of clay into stunning ceramic objects. Learning the fundamental techniques such as preparing the clay, centering it on the wheel, opening the clay, and pulling the walls forms the foundation for successful wheel throwing. When you gain confidence, and you master the art of wheel throwing, you’ll be able to build stronger, better well-balanced, and professional pottery.
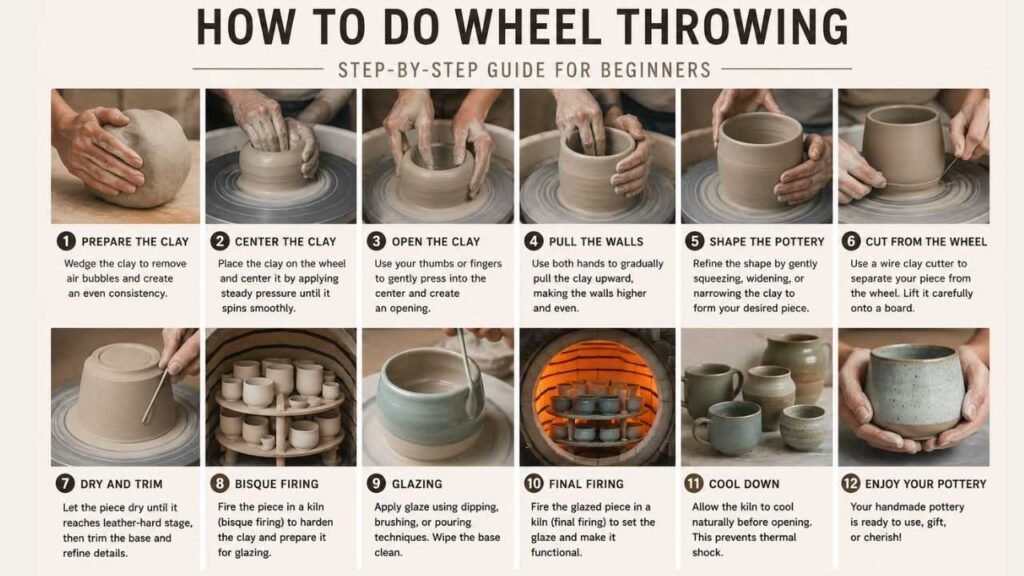
What Is Wheel Throwing?
The wheel throwing technique is a clay making method in which clay is formed on a spinning pottery wheel by hand. The potter controls the clay while the wheel spins to make shapes.
The pottery making has long been practiced and remains one of the most well known techniques for producing ceramics today.
Common wheel thrown pottery comprises:
- Mugs for coffee
- Bowls
- Plates
- Vases
What Equipment Do You Need For Wheel Throwing?
Pottery Wheel
It is the most important tool. Electric wheels are perfect for those new to the field because they maintain a steady speed.
Water Bucket
It keeps your hands moist as you work the clay and keeps it from sticking.
Sponge
It is used to manage water and smooth the clay surface.
Needle Tool
Used for measuring depth or cutting the clay.
Wooden Rib
Smoothes and shapes the walls of pottery.
Wire Cutter
The process is to extract the pottery that has been finished off the wheel.
Trimming Tools
It is essential to refine the clay’s base once it has reached leather-hard.
Apron and Towels
Wheel throwing can be messy, so make sure you wear appropriate clothes.
How Do You Prepare Clay For Wheel Throwing?
Wedge The Clay
Wedging is a method for removing air bubbles and for providing a consistent water level across the clay.
To wedge
- The clay can be cut into smaller pieces.
- Repeatably fold and press.
- Keep going for about 3 to 5 minutes.
- Failure to follow this procedure could result in cracks in firing.
- Form it into a fine ball before placing it on the wheel.
Centering The Clay
It is generally thought to be the most important skill when it comes to wheel throwing.
If the clay doesn’t sit perfectly aligned, each step is made more difficult.
How to Center Clay
- Securely connect the clay to the wheel bat.
- Wash your hands thoroughly.
- Start your wheel at moderate to high speeds.
- Make sure to apply pressure evenly with both hands.
- Make the clay rise into a cone shape.
- Recompress it.
- Repeat the process several times until the clay is spinning smoothly and without moving.
Opening The Clay
After you’ve centered the pot, it’s time to design the interior.
Steps
- Reduce the speed of the wheel.
- Put your thumbs at the center.
- Make sure to press down gently.
- You should leave sufficient clay in the base (around 1 centimeter).
- Your fingertips will widen the opening.
- Verify the base thickness using a needle gauge to ensure it is not too thick.
Pulling The Walls
This is the process that determines the height and width of the pottery.
How to pull walls
- Make sure both hands are joined.
- Assist the outside wall with one hand.
- Use gentle upward pressure starting from the inside.
- Slowly pull from the bottom to the top.
- Every pull makes the walls grow taller or thinner.
How Do You Shape Pottery During Wheel Throwing?
Bowl
To create a bowl, slowly push outwards from the inside while securing the exterior wall with the other hand. As you progress, widen the rim. Bend the sides for an elegant, round design. Do not push too hard to weaken the walls.
Mug
The mug is an uncurved cylinder. The walls should be generally vertical, with a slight outward curve if you wish. Be sure the rim is straight, and the walls are even to create a sturdy shape that can later support the handle.
Vase
To create a vase, gradually increase the height of the walls by applying gentle upward pressure. Once the body has reached the desired height, lightly squeeze the upper section with both hands to narrow the neck and form the vase shape. The combination of a larger base and a smaller opening gives the iconic vase design.
Cylinder
The cylinder is among the shapes that are most essential to master when it comes to wheel throwing, as it is the basis of many designs in pottery. Create straight, vertical walls with a consistent thickness from top to bottom. An aesthetically designed cylinder may later be used to make vessels, pitchers, mugs, and other pieces of furniture.
How Do You Remove Pottery From The Wheel?
After the design:
- Take the wheel off.
- Get rid of any water that has accumulated around the bottom.
- Use a wire cutter to slide it under.
- From one end to the other side in a seamless move.
- Lift the pot carefully (or put it back at the base of the bat until it is dry).
- Do not move clay that is soft too quickly, because it could lose its form.
Drying And Trimming
Once your ceramic has been taken off of its wheel, it will require enough time to dry before moving on to starting the next phase of the procedure. A proper drying process is important for preventing warping, cracks and irregular shrinkage. Set your clay on a smooth surface in an area that is cool and well ventilated and let it take a few hours to dry. Beware of direct sunlight and strong airflow because dryness can be rapid and result in cracking of the clay.
Reaching The Leather-Hard Stage
It is best to trim at the soft stage. The clay is sufficiently firm to maintain its shape. However, it is still pliable enough to be cut or smoothed. The surface should be somewhat damp and cool, but not sticky.
Trimming The Pottery
After the item is fully leather-hard, then place it onto the wheel of pottery and fix it. With the help of trimming tools, take off any clay that is not needed from the base, and then improve the overall form. This helps to create the appearance of a more light, well-balanced piece, while also giving an appearance that is professional.
When trimming, you have the option of:
- Take any excess clay off the base.
- Make a stable and smooth foot ring.
- The overall shape and proportions should be refined.
- Equalize the thickness of the wall.
- Make sure you clean up any rough edges or tool marks.
Bisque Firing
After your clay has dried entirely to a bone-dry stage, it’s now ready to be bisque firing—the initial firing stage used in the production of ceramic. The process transforms the clay into a strong ceramic that can be handled safely and ready to be glazed. As any residual moisture could make the clay crack or explode when fired in the kiln. It is important that the clay is totally dry before firing.
What Happens During Bisque Firing?
When bisque firing, when the clay is fired, it’s heated slowly in a kiln until the desired temperature. When the temperature increases, it causes important changes:
Any remaining moisture is taken away to prevent damage from subsequent firings.
Clay particles are able to permanently join and make the clay tough and long-lasting.
Organic matter and impurities melt out and leave a clear ceramic on the surface.
The ceramic remains permeable, which allows it to take in glaze equally.
The durability of the material increases dramatically, which makes it less likely to break.
Glazing
The process of glazing is when the pottery is given its final appearance and texture. Glazes are a liquid combination of silica and minerals that bind to the clay surface after the final firing. Apart from improving the aesthetics of your ceramic, it can also provide a food safe surface when the right ceramic and firing temperature are used.
Common Glazing Methods
Learning different glazing techniques in pottery allows you to enhance your ceramic creations.
Dipping
Dipping is among the most efficient and popular glazing methods. The bisque fired ceramic is soaked in a glaze bath for just a couple of minutes to create an even, consistent coat. This process works well on mugs, bowls, and other useful pottery.
Pouring
Pouring glaze is great for covering the interior of vessels and also applying different glaze colors. Pour the glaze on top or inside the vessel, then turn the pot to ensure it is evenly distributed before pouring off the excess.
Useful link: what is the purpose of the glaze on pottery in ceramic art
What Happens During The Final Firing?
Following the glazing process, the ceramic goes back to the kiln to finish the last firing. The stoneware ceramic oven is usually fired at about 1220 to 1250 degrees Celsius.
In this firing:
- The glaze melts and bonds to the clay.
- Colors are fully developed.
- The clay becomes waterproof and strong.
- The piece that is finished can be used in everyday life if it is coated with food safe substances.
- After the kiln has completely cooled and your ceramic creation is now ready for you.
What Are The Most Common Wheel Throwing Mistakes?
- Making The Base Too Thin
The base’s thinness may cause it to crack during drying or firing.
- Leaving The Walls Too Thick
Thicker walls are more difficult to dry and can crack.
- Removing The Pot Too Early
Fresh clay may lose its shape when lifted before it has firmed.
- Drying The Pottery Too Quickly
Fast drying raises the risk of warping and cracks.
- Applying Glaze Incorrectly
Applying glaze that is too thick or too thin at the bottom of the pot could result in firing imperfections.
Useful link: 5 essential pottery techniques for intermediate students
Conclusion
The wheel throwing can be an enjoyable experience that mixes imagination, perseverance as well as hands on skills. From preparing and arranging the clay, shaping and trimming, each stage plays an important contribution to the final ceramic work. Although it can take time to perfect the art, every session will help to build confidence and enhance the skills of your pottery skills.
If you are interested in experiencing wheel throwing in a supportive atmosphere, Creative hands pottery studio offers a variety of beginner friendly clay classes that are suitable for kids, adults or couples as well as groups. Our skilled instructors will help you navigate through each step of the process, making sure that you are able to enjoy your experience as you learn the basics of the art of pottery. Ready to try wheel throwing for yourself? Contact Creative Hands Pottery Studio today to book your pottery session and let our experienced instructors guide you through every step of creating your own handmade ceramic masterpiece.
FAQ
1. What kind of clay is the best clay for wheel throwing?
Stoneware clay is one of the top choices for beginner ceramics due to its durability and is suitable to be used in functional ceramics following firing.
2. Why is glazing important in pottery?
Glazing provides texture, color and waterproofing to ceramic. Also, it increases the durability of ceramic and helps make ceramic pieces safe to be used in everyday life in the event that food-safe glazes are used.
3. What temperature is pottery fired at?
Stoneware pottery is usually bisque fired around 950 degrees and the glaze is fired around 1,220-1,250degC depending on the glaze and clay.
